Monday, 5 November 2012

How to access Google docs files without internet connection

It is a normal thing to save notepad,word,excel or powerpoint files in Google docs.Wherever internet is available these files can be accessed by doing login to Google docs panel.
But what you do when you have no internet connection?Or your internet stopped working due to some network problems.In that case you are not able to read these files.To resolve this problem Google provides a
service known as takeout.

With the help of this service you can save your all Google docs files in one zip file.This can be done by just clicking on one button.After this you can save these files in whatever extension you want.
A Simple process is given below by which you can do it.

  • For this first of all go to the link given below:

                                               https://www.google.com/takeout/#custom     
  • After this you have to login to your Gmail account.
  • Now choose Google docs service and than click on create archive button.
  • In this way it will save your Google docs files in one zip file.
  • If you want than you can save your file in popular extensions like excel,word or powerpoint or you can make pdf also.
  • Instead of this,these files can be opened in open office service.

How to Get Free Recharge after Send Free SMS

Some peoples not have a money for Recharge mobile than those people have a good news.
For Indian People can be Recharge your mobile by sending Free SMS.
That's mean you got two awesome offer ( Free Recharge and Free SMS ).

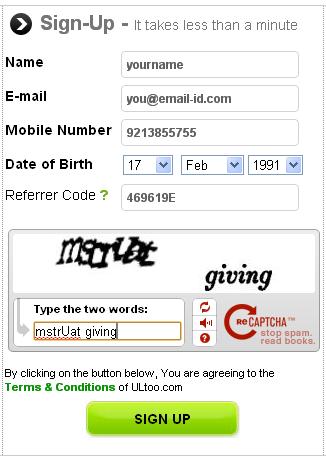
How to Sign-Up Ultoo.com :


  • Firstly Open the Login Page : Click Here.
  • Fill the Login Form with Reffer Id : 469619E.
sign up for free recharge by send free sms

  • That's it...

Benefit of Login :


  • For successful Registration Rs 2.
  • For email verification Rs 1(first time only).
  • For sending sms 2 paisa/sms.
  • For inviting friends(through SMS)Rs 1.
  • For inviting friends(through email)Rs 1.

How to Control your computer through SMS – Free of Cost

The most convenient way to control the PC/System, while you are not at home is controlling it by SMS. Not only Home it can be Office also, in a way you can say controlling the computer wirelessly or remotely. This feature can be widely implemented in the country like India where SMS cost are very cheap.
Control your computer through SMS – Free of Cost
Yes, you can also control your system through blue-tooth of mobile for this you can head on to my previous article here: Control PC via Bluetooth of mobile.

Coming to the point, to control a PC through SMS, yoursystem should be connected to internet. The service I am going to tell is Free of cost, it depends only on your service provider SMS charges. If you have FREE SMS packs of 10 digit mobile number then its totally FREE.
Well the thing we will need to have is twitter.com account, if you dont have one then you can make it on twitter.
Second thing we will need to have ” TweetMyPC ” software which again is a freeware and can be downloaded from here : Click to download directly. TweetMyPC basically runs on the PC all the time to monitor the Twitter updates for the account which you created earlier in background. So, this software should run always on PC. After installing TweetMyPC you will need to configure it correctly.
For that here we go :
> Run TweetMyPC by clicking on its icon from Desktop. It will start running in background, you can view it in system tray :
Control your computer through SMS – Free of Cost
Right Click on the icon and select Edit Setting. Now a new window will appear asking you username and password of Twitter. Fill in the username and password of the Twitter account Correctly.
Control your computer through SMS – Free of Cost
> Save and close the window.
Now we are done with this stage of setup.
For updating Twitter status/controlling PC through SMS :
> For completing this step, we will head on to a FREE status update service which is available in India. It is here: http://www.smstweet.in/
Control your computer through SMS – Free of Cost
> Open the site, and click on ” Sign in with Twitter ” button. Allow the site to access Twitter. And enter you mobile number, through which you are going to update it. This is the one way of registering your mobile, or you can also Setup your mobile by Simply Sending SMS  ‘ TWEET REGISTER  to 09220092200.
Now you are done. Start controlling your system wirelessly. But before that where are the commands which you will use to control your PC ?
List of Commands to Control PC:
>To shut down the PC you will need to send SMS as ” TWEET Shutdown ” to 09220092200 , without quotation.
Here are some more commands, but before sending those you will need to add TWEET word before each command.
Control your computer through SMS – Free of Cost
Further, you can also add your own custom commands in TweetMyPC software

Make a GSM SIM Clone using PIC Microcontroller (working and tested)


Make a GSM sim using PIC Microcontroller (working and tested)
( Caution: sim clone is illegal, just for educational purposes only..! ) 
First you want to get IMSI and KI number from your original SIM using SIM Card Reader/Writer <Smart Card Reader> (you can buy or make it, Search in Google then you can find cheap one). If you wish to make your own one, see this step by step tutorial for "Make Simple GSM SIM card Reader / Writer" in my site.
then follow the instructions carefully given below to make your own GSM sim card.

Step 1:
Download SIM-EMU Configurator  here >> SIM_EMU_6.01_CFG_v2.1.zip
Download two hex files "16f877a.hex" and "24c64.hex" file from my download page.

Step 2:
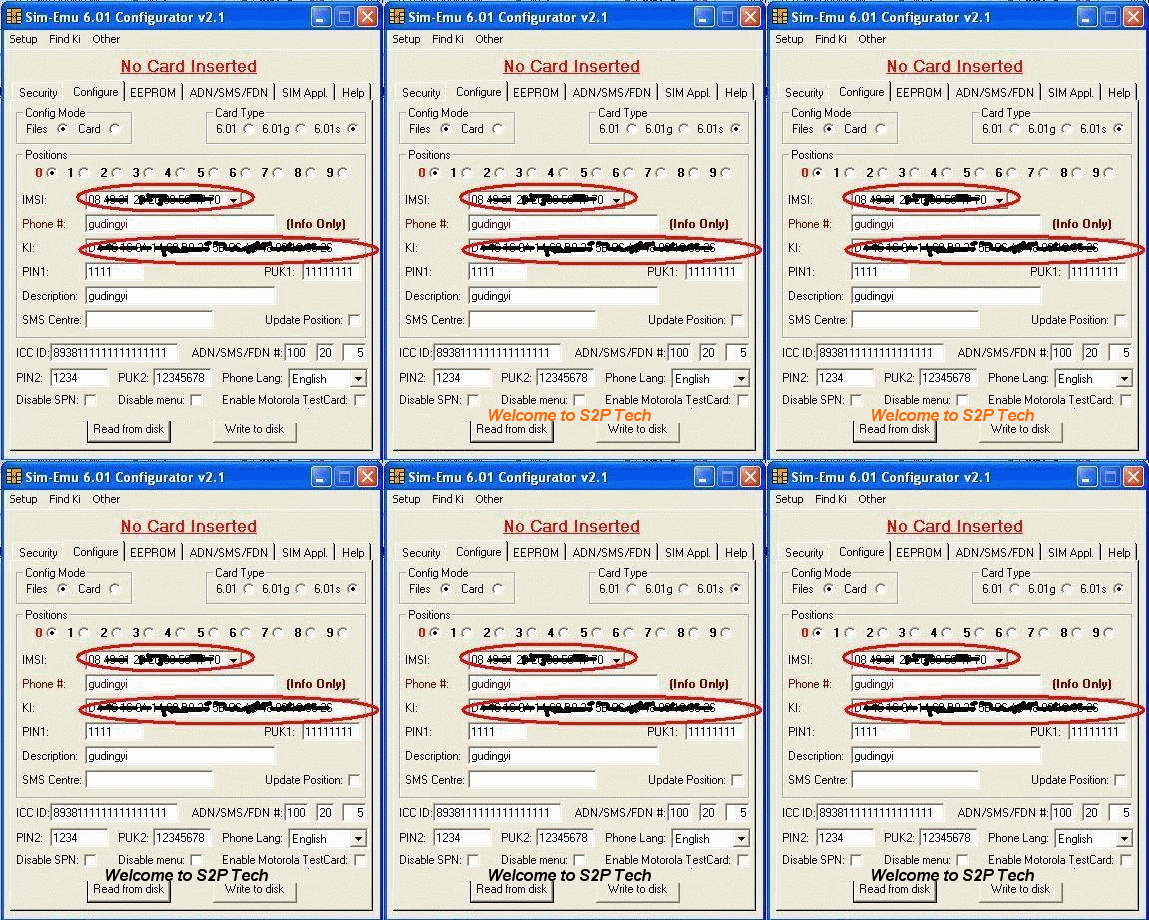
Install and run SIM-EMU Configurator, then go to configure menu. (see figure below)


figure 1

then click on "Read from disk" and load "16f877a.hex" and then it will ask to load EEPROM file and you can load "24c64.hex" that you already downloaded. after loading two hex files you want to edit IMSI and KI field with you scanned using sim scanner.(if u want you can edit PIN and PUK, defalt values are 1111 and 11111111) see figure2.


figure 2

Then Save your edited files(click on "Write to disk"). save flash file as "16f877a_my.hex" and EEPROM file as "24c64_my.hex". then you want to write these two files to PIC and EEPROM.

Step 3 :
Use PIC parallel port programmer ( Working and tested ) or other MC programmer and writes "16f877a_my.hex" file to PIC16F877A and writes "24c64_my.hex" file to 24c64 EEPROM(its a very famous and cheap memory chip) one after one.

Step 4 :
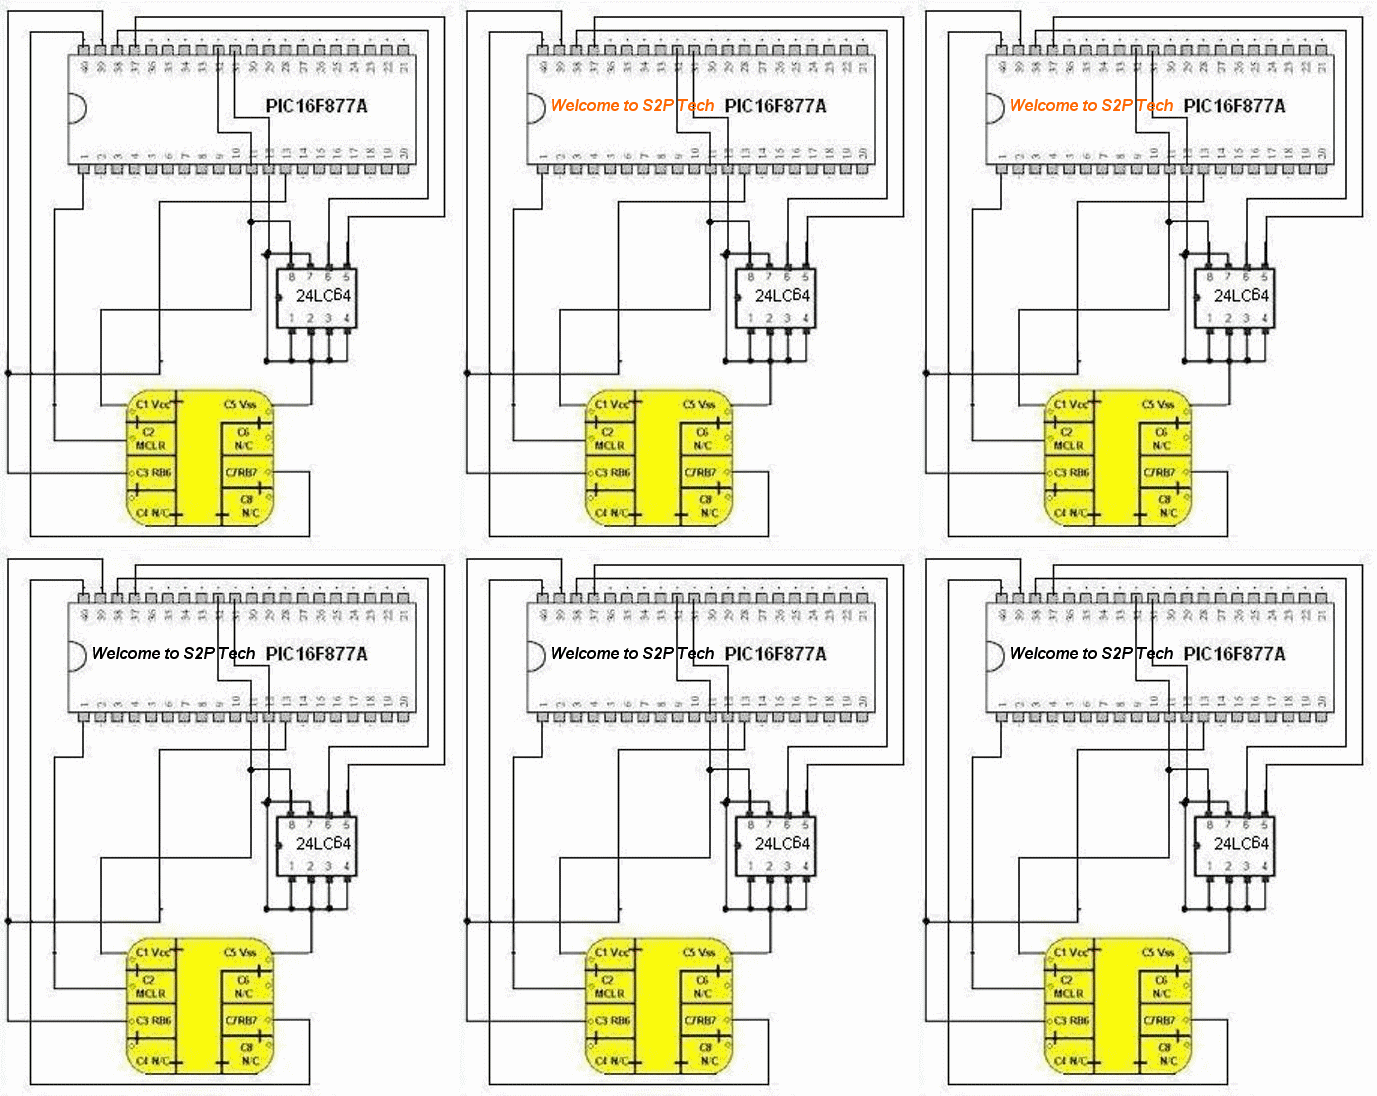
Now connect PIC16F877A, 24c64 and sim card adapter. see figure3.


figure 3

you have done it..! just connect this gadget with your mobile phone and enjoy. If you have any problem regarding this please comment below, I'll try to solve it. and if you are interested in this work please don't forget to share on facebook. (  just click and share the fb like button top of the page :-)  )
 NOTE: You can write up to 10 different KIs and IMSIs to this gadget. In above Step 2 you can select "Positions" (0 to 9) and enter different KIs and IMSIs. then you can see a new menu in your phone "SIM-EMU Configurator". you can switch between SIMs by entering this menu

How to Move Photo From Phone to Computer Just By Tap

Bump has managed to garner quite a following among iPhone and Android users, but they've so far only been able to transfer files between two mobile devices, not between their phone and their home computer.


The company's managed to find a workaround of sorts to that limitation though, and has today rolled out a new feature that will let you send photos (and only photos) from your phone to your desktop. To do so, you'll first have to update the Bump app on your phone and then head to the Bump website, at which point you can simply tap the spacebar to transfer your photos (with your phone if you want to keep the whole "bump" motif going). As you can probably surmise, that means photos are transferred to Bump's website and not directly to your computer, but that does have the added benefit of making the photos a bit easier to share on your social network of choice.

Monday, 22 October 2012

How to Control your computer through SMS – Free of Cost

The most convenient way to control the PC/System, while you are not at home is controlling it by SMS. Not only Home it can be Office also, in a way you can say controlling the computer wirelessly or remotely. This feature can be widely implemented in the country like India where SMS cost are very cheap.
Control your computer through SMS – Free of Cost
Yes, you can also control your system through blue-tooth of mobile for this you can head on to my previous article here: Control PC via Bluetooth of mobile.

Coming to the point, to control a PC through SMS, yoursystem should be connected to internet. The service I am going to tell is Free of cost, it depends only on your service provider SMS charges. If you have FREE SMS packs of 10 digit mobile number then its totally FREE.
Well the thing we will need to have is twitter.com account, if you dont have one then you can make it on twitter.
Second thing we will need to have ” TweetMyPC ” software which again is a freeware and can be downloaded from here : Click to download directly. TweetMyPC basically runs on the PC all the time to monitor the Twitter updates for the account which you created earlier in background. So, this software should run always on PC. After installing TweetMyPC you will need to configure it correctly.
For that here we go :
> Run TweetMyPC by clicking on its icon from Desktop. It will start running in background, you can view it in system tray :
Control your computer through SMS – Free of Cost
Right Click on the icon and select Edit Setting. Now a new window will appear asking you username and password of Twitter. Fill in the username and password of the Twitter account Correctly.
Control your computer through SMS – Free of Cost
> Save and close the window.
Now we are done with this stage of setup.
For updating Twitter status/controlling PC through SMS :
> For completing this step, we will head on to a FREE status update service which is available in India. It is here: http://www.smstweet.in/
Control your computer through SMS – Free of Cost
> Open the site, and click on ” Sign in with Twitter ” button. Allow the site to access Twitter. And enter you mobile number, through which you are going to update it. This is the one way of registering your mobile, or you can also Setup your mobile by Simply Sending SMS  ‘ TWEET REGISTER  to 09220092200.
Now you are done. Start controlling your system wirelessly. But before that where are the commands which you will use to control your PC ?
List of Commands to Control PC:
>To shut down the PC you will need to send SMS as ” TWEET Shutdown ” to 09220092200 , without quotation.
Here are some more commands, but before sending those you will need to add TWEET word before each command.
Control your computer through SMS – Free of Cost
Further, you can also add your own custom commands in TweetMyPC software

Make a GSM SIM Clone using PIC Microcontroller (working and tested)


Make a GSM sim using PIC Microcontroller (working and tested)
( Caution: sim clone is illegal, just for educational purposes only..! ) 
First you want to get IMSI and KI number from your original SIM using SIM Card Reader/Writer <Smart Card Reader> (you can buy or make it, Search in Google then you can find cheap one). If you wish to make your own one, see this step by step tutorial for "Make Simple GSM SIM card Reader / Writer" in my site.
then follow the instructions carefully given below to make your own GSM sim card.

Step 1:
Download SIM-EMU Configurator  here >> SIM_EMU_6.01_CFG_v2.1.zip
Download two hex files "16f877a.hex" and "24c64.hex" file from my download page.

Step 2:
Install and run SIM-EMU Configurator, then go to configure menu. (see figure below)

Sim emu configurator1

figure 1

then click on "Read from disk" and load "16f877a.hex" and then it will ask to load EEPROM file and you can load "24c64.hex" that you already downloaded. after loading two hex files you want to edit IMSI and KI field with you scanned using sim scanner.(if u want you can edit PIN and PUK, defalt values are 1111 and 11111111) see figure2.

Sim emu configurator2
figure 2

Then Save your edited files(click on "Write to disk"). save flash file as "16f877a_my.hex" and EEPROM file as "24c64_my.hex". then you want to write these two files to PIC and EEPROM.

Step 3 :
Use PIC parallel port programmer ( Working and tested ) or other MC programmer and writes "16f877a_my.hex" file to PIC16F877A and writes "24c64_my.hex" file to 24c64 EEPROM(its a very famous and cheap memory chip) one after one.

Step 4 :
Now connect PIC16F877A, 24c64 and sim card adapter. see figure3.

GSM Sim Clone using Microcontroller
figure 3

you have done it..! just connect this gadget with your mobile phone and enjoy. If you have any problem regarding this please comment below, I'll try to solve it. and if you are interested in this work please don't forget to share on facebook. (  just click and share the fb like button top of the page :-)  )
 NOTE: You can write up to 10 different KIs and IMSIs to this gadget. In above Step 2 you can select "Positions" (0 to 9) and enter different KIs and IMSIs. then you can see a new menu in your phone "SIM-EMU Configurator". you can switch between SIMs by entering this menu